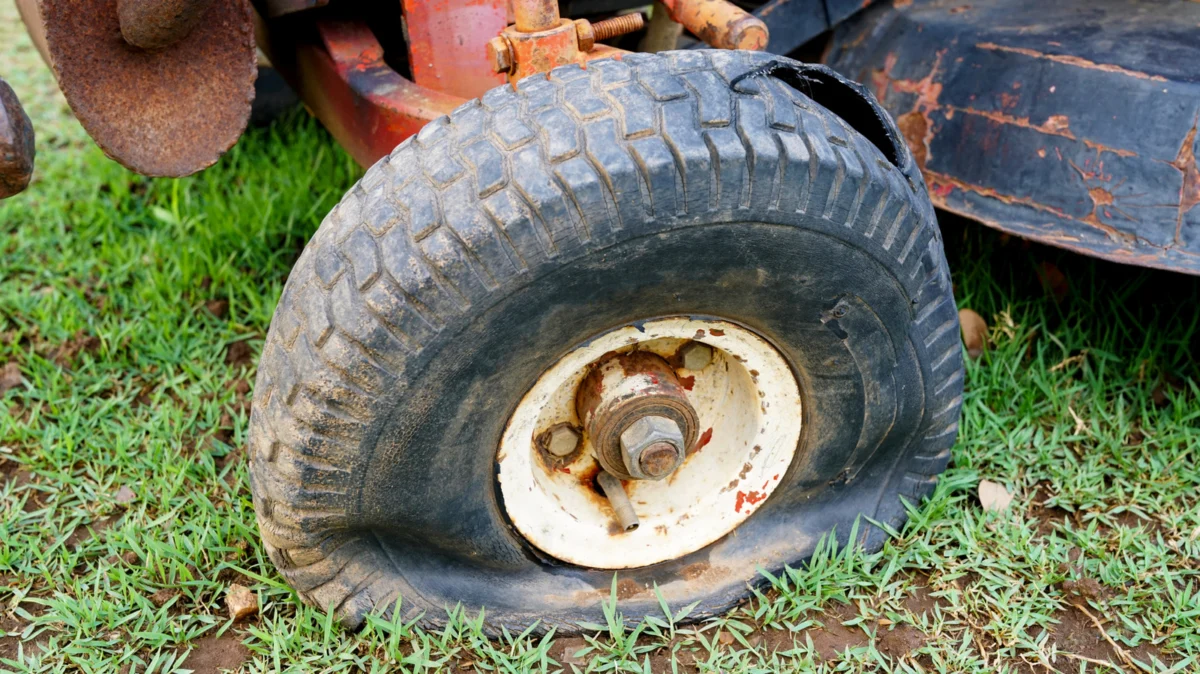
For many homeowners, the sight of a flat tire on a riding lawn mower is a frustrating weekend project killer. Just as you prepare to tackle a tall lawn, the machine sags to one side, signaling a puncture or a slow leak. While the instinct for many is to reach for a quick fix—such as a tire plug or a bottle of sealant—the reality of tire maintenance is far more nuanced. Understanding when you can safely repair a mower tire and when you must opt for a replacement is essential for both your safety and the longevity of your equipment.
The Fundamentals of Tire Integrity
Maintaining structurally sound tires on any vehicle, including turf equipment, is paramount. Tires are not merely rubber shells; they are engineered components designed to distribute the weight of the machine, provide traction on varied terrain, and absorb the shocks of uneven ground. When a tire sustains damage, its structural integrity is compromised.
While a plug or patch can successfully repair a tire on a passenger vehicle, the same standards do not always translate perfectly to riding mowers. Mower tires often feature different ply ratings, sidewall thicknesses, and tread patterns—such as turf-friendly, ribbed, or aggressive lug designs—that behave differently under stress. The size, location, and severity of a puncture play a significant role in determining whether a repair will hold or if the tire has reached the end of its functional life.
The "Quick Fix" Reality Check
For many, a DIY plug kit is the first line of defense. These kits involve inserting a sticky, rubberized strip into the puncture hole, sealing it from the outside. In many cases, if the puncture is in the center of the tread and relatively small, a plug can be a permanent solution. However, if the puncture is located on the sidewall or shoulder of the tire, it is fundamentally non-repairable. The sidewall undergoes significant flexing during operation; any patch or plug in this area is almost certain to fail, creating a safety hazard.
Chronology of a Repair: A Step-by-Step Approach
If you are faced with a flat tire, it is important to follow a logical, safety-first sequence to assess the damage.
1. Initial Assessment
Before reaching for tools, clean the tire surface. Look for the culprit: a nail, a sharp stone, a piece of wire, or a thorn. If the object is still embedded, leave it in place until you are ready to perform the repair, as it may be temporarily plugging the hole. Assess the severity of the damage. Is it a clean puncture, or is there a jagged tear? A tear larger than a quarter-inch usually necessitates a full tire replacement.

2. The Decision Phase
Consult your owner’s manual. Manufacturers often provide specific guidance on tire repair that aligns with the machine’s weight and intended use. If the manual prohibits plugging, or if you suspect the internal structure (the belts or liner) is compromised, skip the repair and look for a replacement tire.
3. Execution (The Proper Method)
If you determine a repair is viable, the professional standard—endorsed by organizations like the Tire Industry Association (TIA)—is to remove the tire from the rim. This allows for an internal inspection.
- Lifting: Use a proper mower jack or lift, ensuring the machine is stable on jack stands. Never rely solely on a hydraulic jack.
- Removal: Remove the wheel from the axle, deflate the tire completely, and use tire irons or a bead breaker to separate the tire from the rim.
- Internal Patching: A "patch-plug" (a combination unit) is the gold standard. It fills the puncture hole from the inside and seals the inner liner, preventing air from leaking into the tire’s internal structure.
- Re-sealing: Clean the rim flange thoroughly. Rust and debris on the rim are the leading causes of slow leaks after a "successful" repair.
- Inflation and Testing: Inflate the tire to the manufacturer’s recommended PSI. Use a soapy water solution to spray the repair site; if bubbles appear, the seal is not airtight, and the tire must be replaced.
Supporting Data and Technical Considerations
Why does the TIA advise against simple external plugs? The primary reason is "hidden damage." When a tire loses air pressure, the sidewalls flex excessively under the weight of the mower. This can cause internal separation of the rubber layers, which is invisible to the naked eye. An external plug might hold air for a week, but the internal structural damage could lead to a sudden blowout while you are traversing a slope or turning, which could result in a rollover.
Furthermore, tire sealants—often sold as "fix-a-flat" in a can—should be considered a temporary emergency measure only. While they can seal small, annoying leaks caused by thorns or wire, they can also cause long-term issues. Sealants can corrode metal rims over time, imbalance the wheel, and make the tire extremely difficult for a professional technician to clean and repair properly if you decide to go to a shop later.
Expert Perspectives and Official Guidelines
The Tire Industry Association maintains that there is no such thing as a "universal" tire repair. Guidelines stipulate that:
- Repairs are restricted to the tread area only.
- Punctures exceeding 1/4 inch in diameter are generally non-repairable.
- Multiple punctures should not be clustered together.
- Proper repairs require a two-piece system (a plug and a patch) applied from the inside.
Many lawn mower manufacturers include clauses in their warranty documentation that specify the use of "unapproved" repair methods can void the warranty on the wheel assembly or the drivetrain, especially if the repair leads to uneven tire pressure that puts excessive strain on the transaxle.

The Implications of DIY vs. Professional Repair
Choosing the right path depends heavily on your mechanical aptitude and the equipment available to you.
When to DIY
If you have the tools (bead breakers, tire irons, torque wrenches) and the damage is a clean, small puncture in the center of the tread, performing a high-quality internal repair is a cost-effective way to get back to work.
When to Call a Professional
- Lack of Experience: If you have never broken a bead or patched a tire, the risk of damaging the rim (which is expensive to replace) or hurting yourself with high-tension tools is significant.
- Complex Damage: If the tire has multiple punctures, sidewall damage, or if the rim itself appears bent or rusted.
- Time Constraints: If you are unsure about the safety of your repair, the cost of a new tire is a small price to pay compared to the cost of a potential mower accident.
Long-Term Safety and Maintenance
To avoid these issues in the future, monitor your tire pressure monthly. Most flat tires on mowers are caused by running them under-inflated, which allows the tire to "roll" off the rim seat or pinch against the rim flange when hitting obstacles. Keep your lawn clear of debris, such as fallen branches, discarded metal, or sharp garden tools.
Ultimately, while the allure of a quick, five-minute plug is strong, a cautious approach is better. If the tire looks questionable, feels soft, or has visible internal damage, do not gamble with it. Whether you choose to repair it correctly or replace it entirely, ensuring your tires are in peak condition is the best way to keep your equipment running reliably throughout the mowing season. When in doubt, defer to the professional—the safety of your machine and your own physical well-being are worth far more than the cost of a new tire.