
When Gearbox and Gunfire Games approached the world-renowned cosplay artist Kamui to create a promotional costume for the highly anticipated Remnant II, the challenge was clear: bring the gritty, high-octane aesthetic of a post-apocalyptic world into the physical realm. The result was a masterclass in mixed-media craftsmanship, blending 3D modeling, advanced electronics, and traditional garment modification. This article explores the intricate journey of the Remnant II Gunslinger project, detailing the fusion of cutting-edge technology and classic artistic grit.
The Vision: A DPS-Heavy Cowboy
The Remnant II Gunslinger archetype is defined by its high-damage, rapid-fire capability—a classic “cowboy” fantasy filtered through a decaying, alien-infested lens. The armor and weapon designs are characterized by organic shapes, pulsing cores, and a sense of desperate, cobbled-together utility. For this project, the goal was not just to replicate the in-game assets, but to create a wearable, functional manifestation of the character. By blending traditional crafting techniques with repurposed, store-bought clothing, the project aimed to ground the character in a believable, tactile reality.

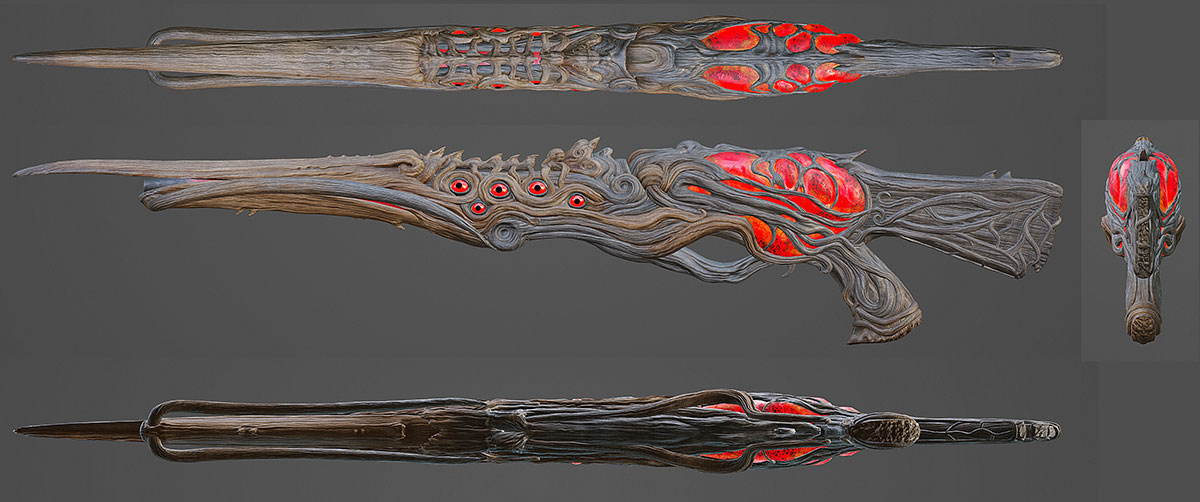
Chronology: The Making of the Merciless Blaster
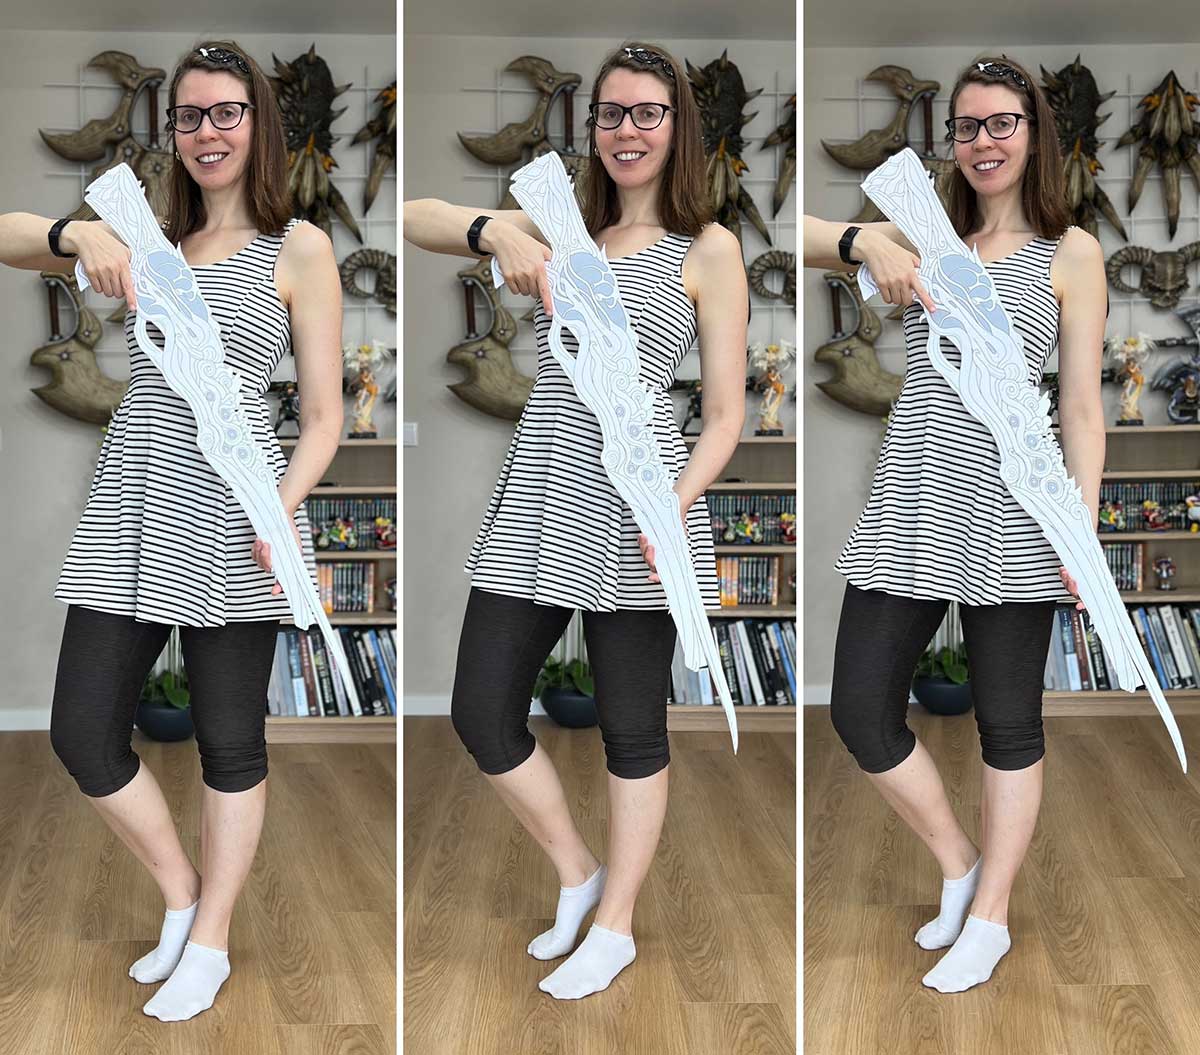
Phase 1: Prototyping and Scaling
Every great prop begins with a blueprint. Before any foam was cut, the team, led by Kamui and her partner Benni, focused on scaling. Achieving the correct proportions is the most common hurdle in prop making. Benni drafted detailed blueprints, which were then printed as three distinct paper dummies. This "paper-first" method allowed for a rapid iteration of size, ensuring the weapon felt proportional to the wearer’s frame. While the team utilized a high-end printer, they noted that standard home office printers are equally effective for this stage, emphasizing that the process is about technique rather than expensive hardware.
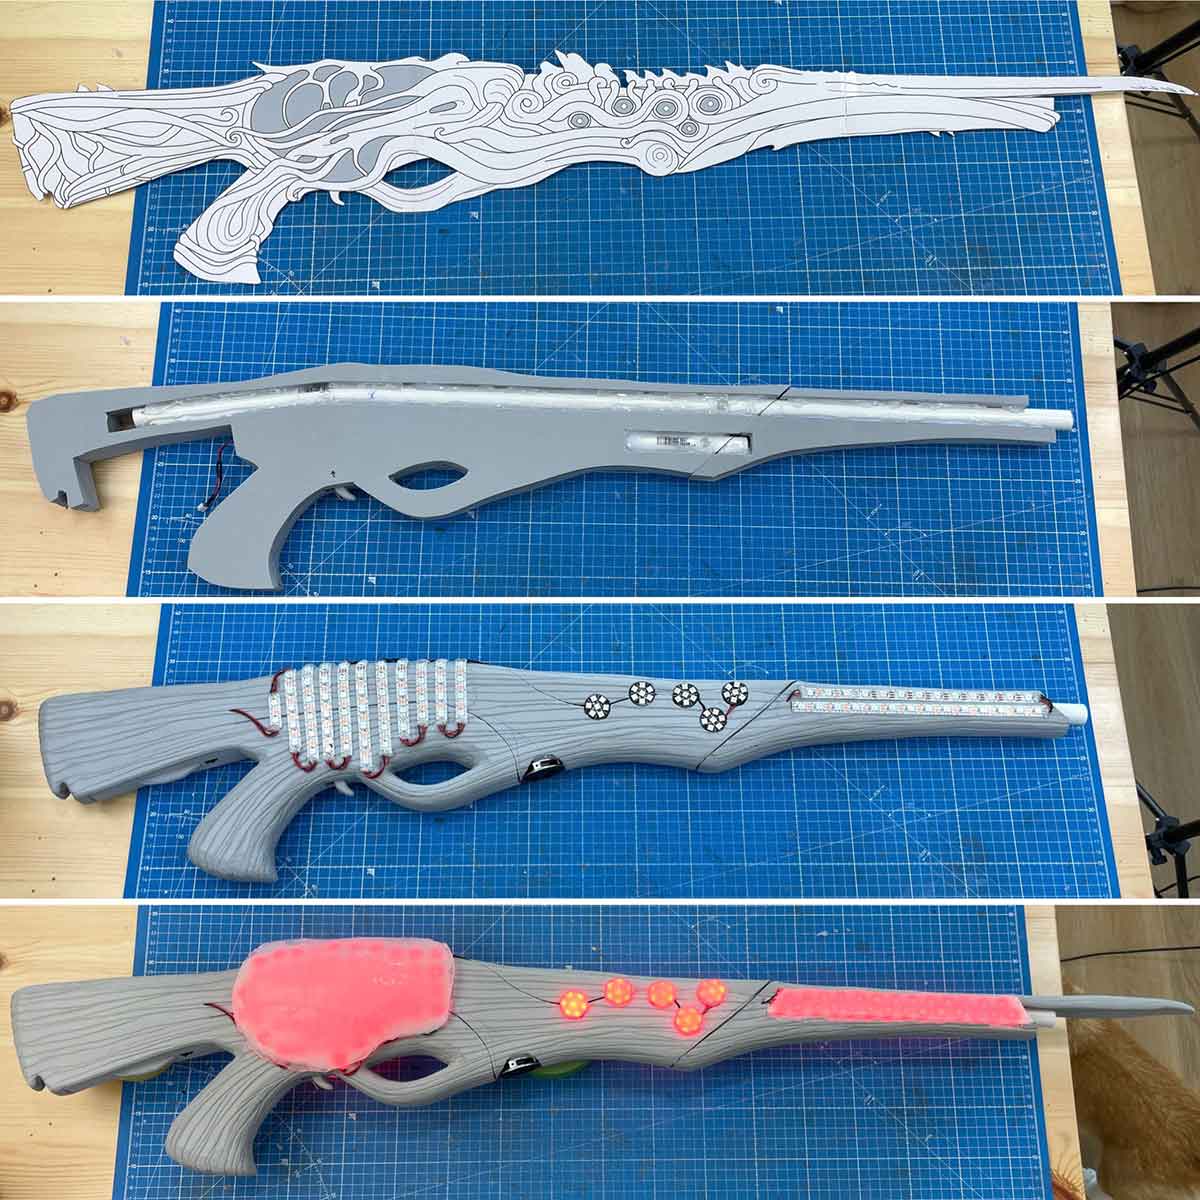
Phase 2: Structural Integrity
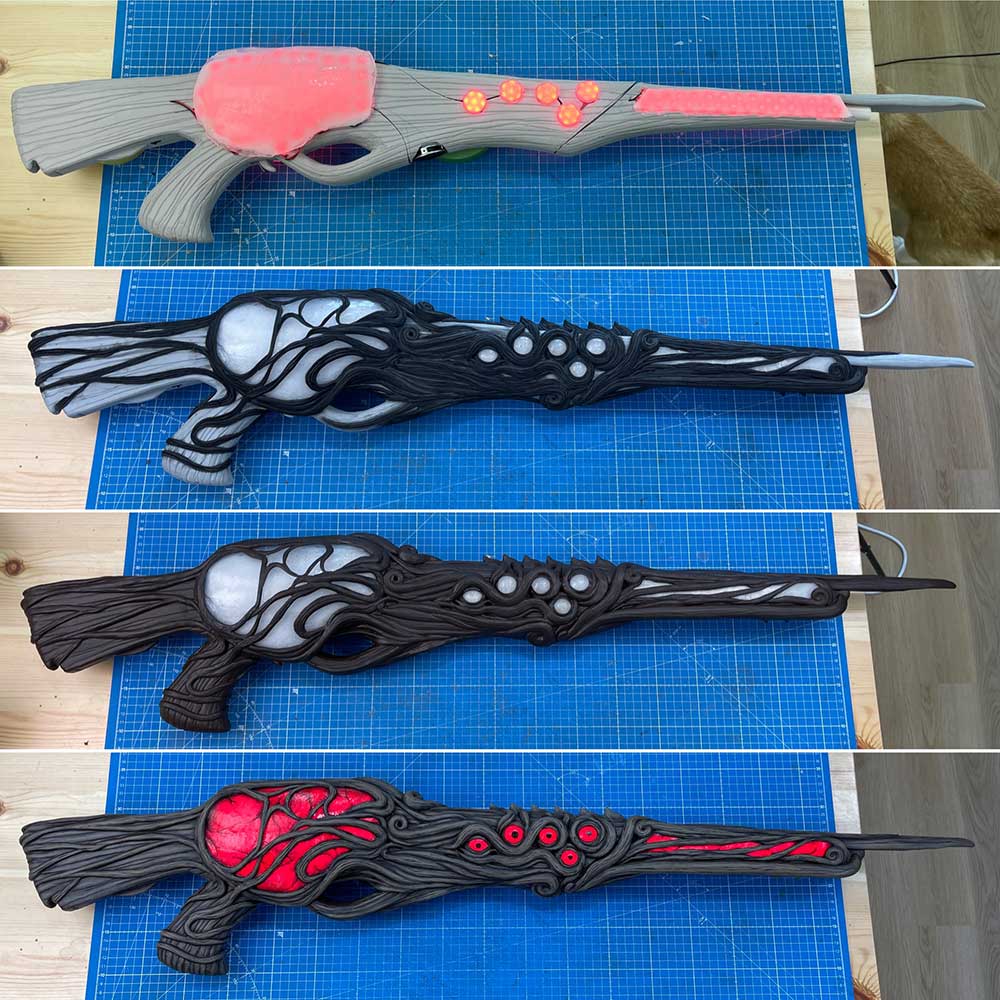
With the scale determined, the foundation of the "Merciless Blaster" was constructed using non-plasticized PVC pipe. This provided a rigid core that could be heat-shaped to match the weapon’s silhouette. High-density EVA foam was then layered over this frame. The team went beyond mere aesthetics, integrating a functional trigger mechanism designed to activate both light and sound effects, turning a static prop into an interactive piece of equipment.
Phase 3: The Electronic Heart
The hallmark of a high-quality cosplay prop is its lighting. For the Merciless Blaster, the team utilized addressable RGB LED strips. While the market offers a wide variety of LED densities, the team settled on 60 LEDs per meter as the "sweet spot" for brightness and power efficiency. To diffuse the harsh light, they employed translucent thermoplastic pellets, which created a soft, organic glow reminiscent of the weapon’s in-game pulsing core. The wiring was carefully routed to allow for animated effects across the blaster’s ten "eyes," successfully simulating the alien biology of the in-game asset.
Phase 4: Sculpting and Finishing
To achieve the final, intricate shape, the team relied on high-density foam clay. This material is ideal for organic, flowing designs, allowing the artist to sculpt "sausages" of material directly onto the blaster’s surface. Once the clay air-dried, it was sanded to a smooth finish, primed with three layers of Flexbond to protect the surface, and painted using acrylics. The painting process focused on realism, emphasizing the wear and tear inherent to the world of Remnant II.
Creating the Gunslinger Costume
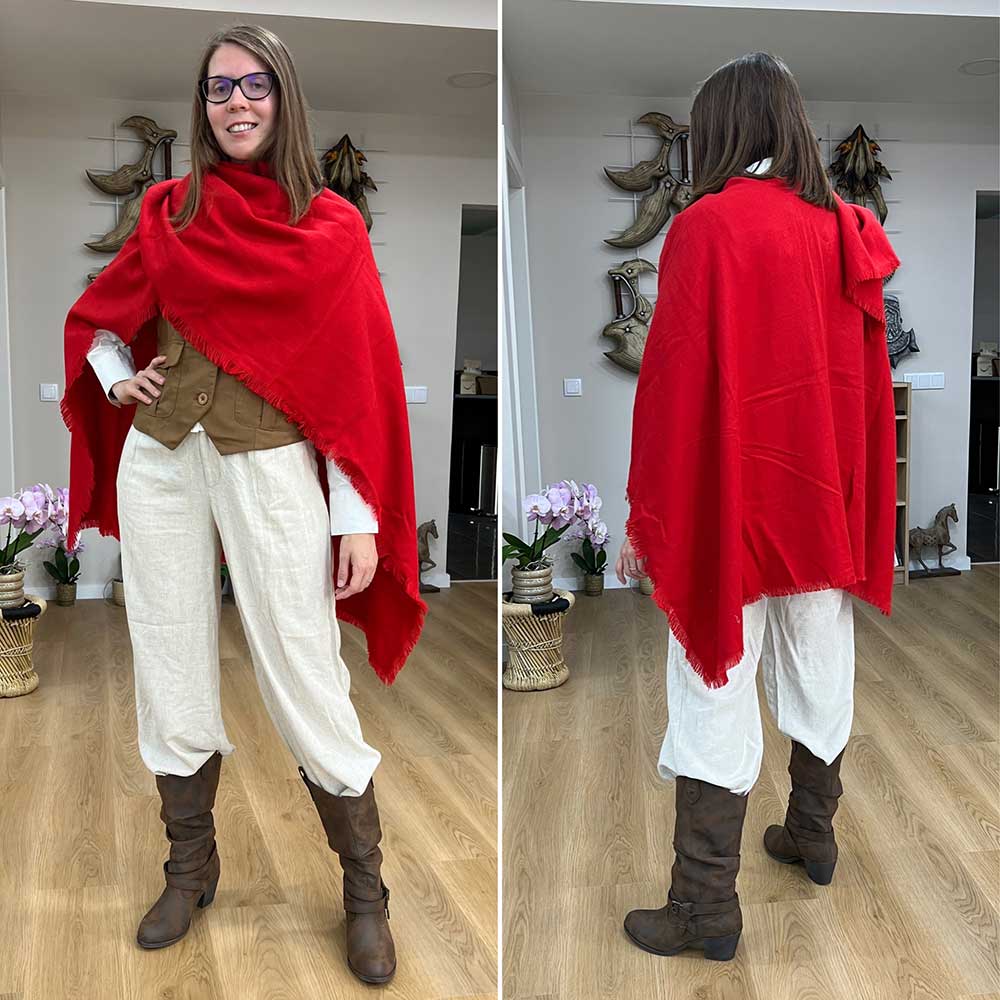
While many professional cosplayers build every garment from scratch, the Gunslinger project prioritized a "repurposed" approach. In a post-apocalyptic setting, clothing is scavenged and adapted.
- The Sourcing: The team scoured local stores for items that could serve as a base: a red poncho, a brown vest, a white blouse, wide-legged linen pants, and rugged cowboy boots.
- The Modification: Each piece underwent extensive weathering. Using dyes, paints, and intentional fabric destruction, the team transformed store-bought items into a cohesive, gritty costume that looked as though it had survived an apocalypse.
- The Leatherwork: A custom holster was crafted from faux leather to hold the prop revolver, adding another layer of authenticity to the ensemble.
Foam Armor Fabrication
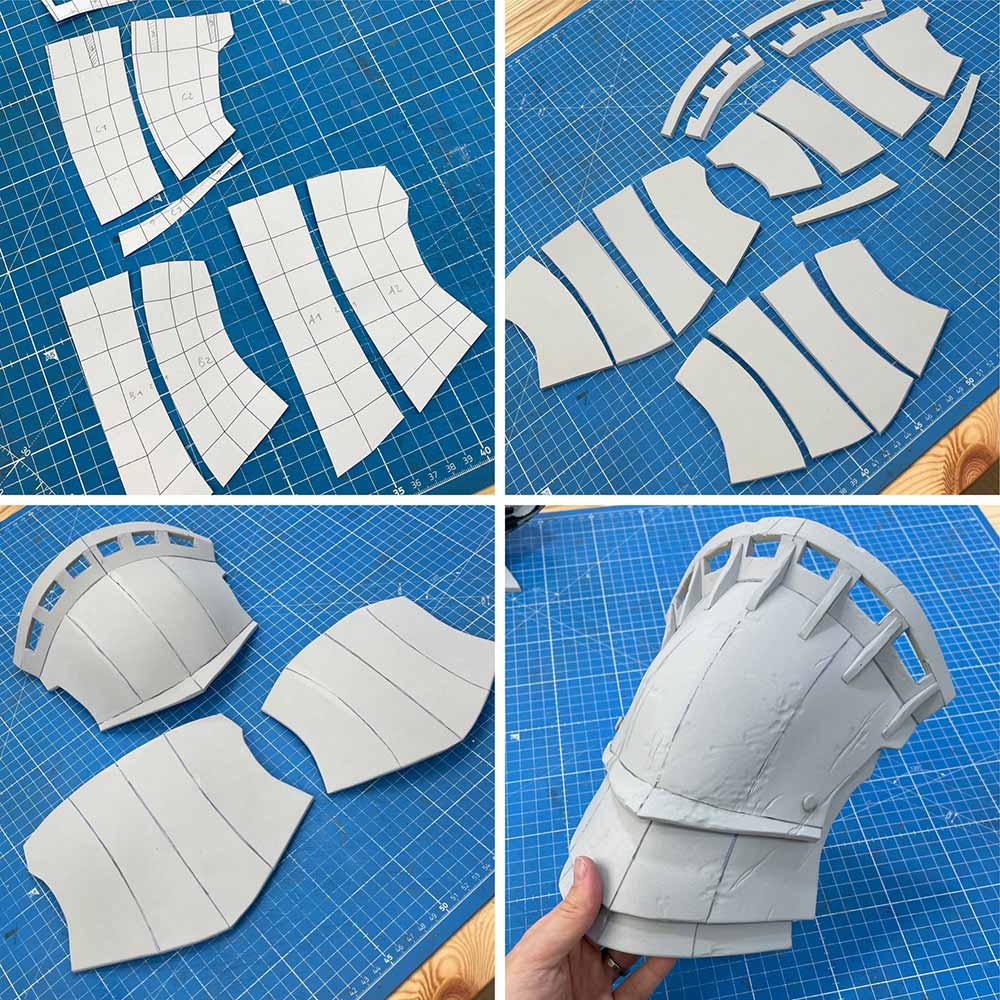
The armor was created using an advanced digital-to-physical workflow. Using the game’s source files or high-quality screenshots, Benni modeled the armor in Blender. This 3D data was then unfolded into 2D patterns—a process similar to "Pepakura"—which provided the exact templates for cutting the 6mm black EVA foam.
Once cut and glued with contact cement, the armor received a "battle damage" treatment using a Dremel rotary tool. This was a critical step; without the texture added by the Dremel, the foam would look too smooth and artificial. After applying a heavy base coat of primer, the metallic finish was achieved through a multi-stage process involving silver paint, hairspray (as a masking agent), and dark washes. By scratching away the top layer of paint with a metal sponge, the team achieved a convincing, chipped-metal effect.
Supporting Data: The Tools of the Trade
A project of this scale requires a specific arsenal of tools and materials. For those looking to replicate these techniques, the following were essential:
- Materials: 6mm and high-density EVA foam, foam clay, Flexbond primer, addressable RGB LED strips, thermoplastic pellets, faux leather, and various acrylic paints (Vallejo Metallic range).
- Tools: Dremel 4000 (for sculpting and weathering), standard heat gun (for foam shaping), contact cement, airbrush equipment, and a 3D-modeling workstation running Blender.
Official Responses and Collaborative Impact
The collaboration between Gearbox, Gunfire Games, and the cosplay community highlights the growing importance of "fan-made" marketing in the gaming industry. By commissioning professional artists to interpret their designs, game developers provide a tangible bridge between the digital experience and reality.
For the Gunslinger project, the photoshoot was conducted at an abandoned fish farm on the island of Madeira. The choice of location was strategic; the presence of an abandoned truck with authentic, weather-worn rust provided a perfect, real-world backdrop that mirrored the aesthetic of Remnant II. This attention to detail ensured that the final photography was not merely a display of a costume, but a narrative extension of the game’s world.
Implications: The Evolution of Cosplay
The Remnant II project serves as a case study for the evolution of modern cosplay. The shift toward 3D modeling and digital fabrication has significantly reduced the time spent on "trial and error" pattern making, allowing artists to spend more time on the details that truly matter: painting, electronics, and storytelling.
Furthermore, the "repurposing" philosophy applied to the costume emphasizes that professional-grade cosplay does not always require high-cost tailoring. By focusing on the history of an item—how it was damaged, stained, and worn—the artist can elevate even the simplest thrift-store find into a high-fantasy masterpiece.
As the industry moves forward, the intersection of game development and community crafting will likely deepen. Projects like the Gunslinger prove that when developers provide access to reference material and collaborate with skilled creators, the result is a deeper, more immersive engagement for the player base. The success of this build rests on the balance between high-tech precision—the 3D printed armor and programmed LEDs—and the low-tech, tactile art of weathering and hand-sculpting, creating a final product that is as convincing to the eye as it is to the touch.
Whether you are a seasoned prop maker or a novice, the key takeaway from the Remnant II Gunslinger project is clear: the best results come from a willingness to experiment, a commitment to detail, and a deep appreciation for the story the costume is trying to tell.