[DATELINE – GAMELAND, CYGNUS REALM] – As anticipation builds for Yacht Club Games’ upcoming gothic-horror action-adventure, Mina the Hollower, early glimpses into its challenging world are beginning to surface. Among the first significant hurdles players will face is the formidable boss of the Queensbury Crypt, a twisted entity known only as the Duchess. This encounter is more than just a battle; it’s a meticulously designed trial that serves as a crucial skill gate, demanding strategic preparation, precise execution, and astute resource management. For many, the Duchess will be the inaugural true test of their mettle in Mina’s haunting journey.
Main Facts: The Crypt’s Corrupted Guardian
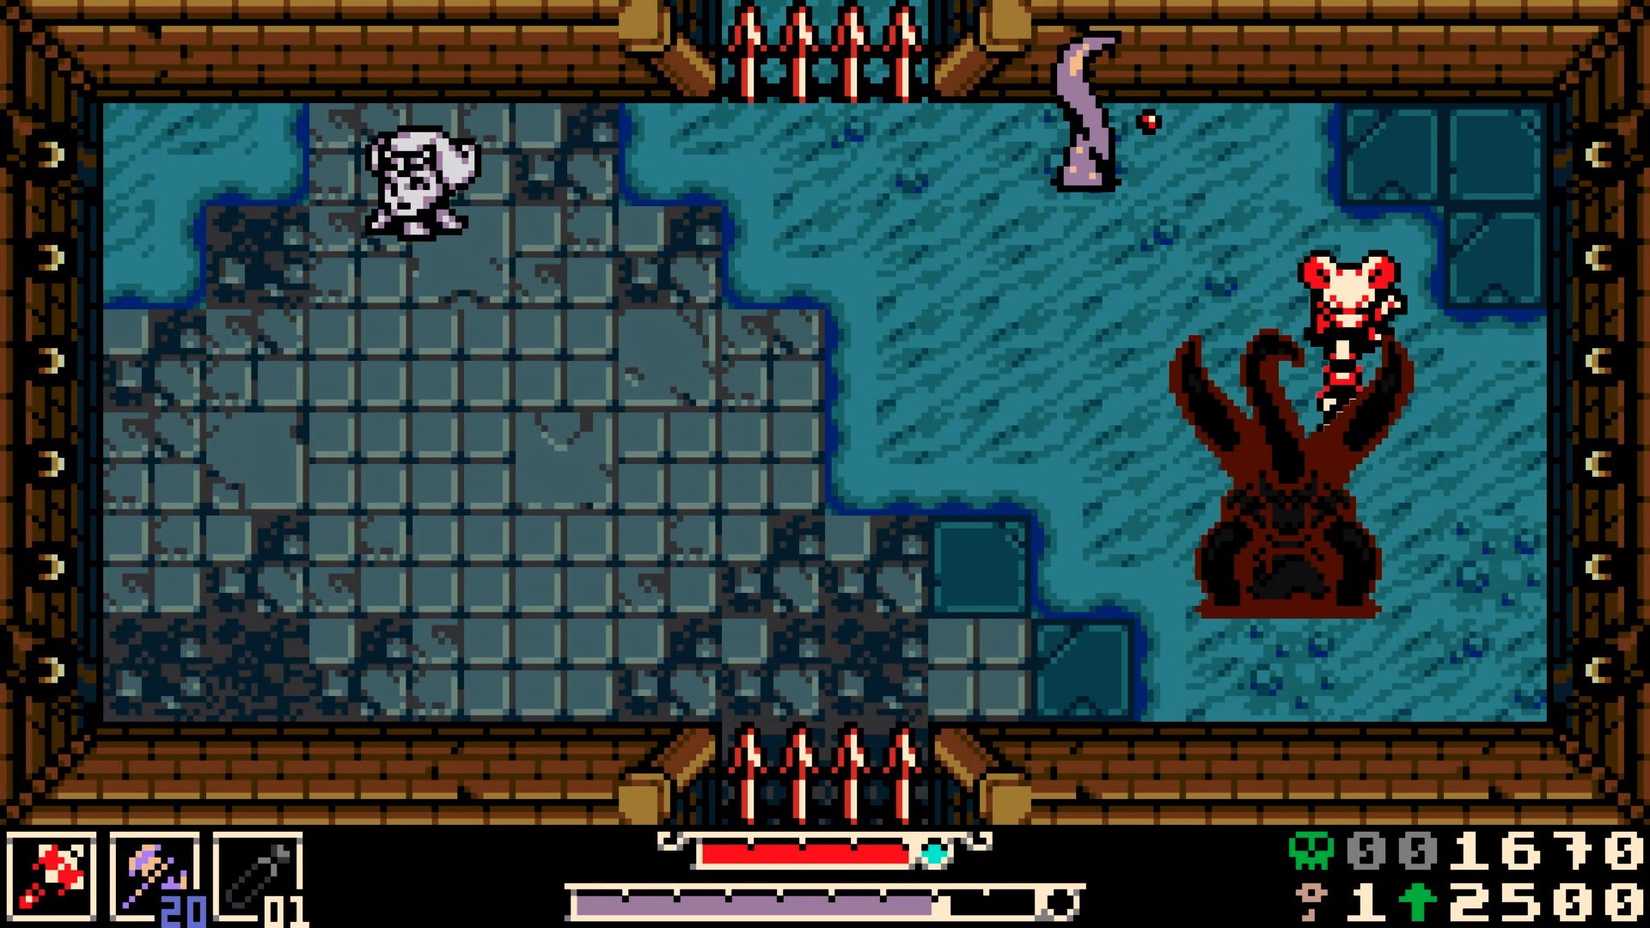
The Queensbury Crypt, an early-game dungeon in Mina the Hollower, culminates in a confrontation with a grotesque approximation of the Duchess. This boss fight is poised to be the first major combat crucible for players, designed not merely as a test of reflexes but as an intricate puzzle of pattern recognition and resource allocation. Yacht Club Games, renowned for its challenging yet fair gameplay in titles like Shovel Knight, appears to have imbued the Duchess with a deceptive complexity. Players are warned against expending their precious resources prematurely, as the battle unfolds across two distinct phases, each escalating in intensity and demanding a careful balance of offense and defense. The game’s signature retro-inspired aesthetic, reminiscent of classic Game Boy Color titles, belies a sophisticated combat system that punishes recklessness and rewards calculated bravery.
Chronology: Preparing for the Descent into Madness
The journey to the Duchess is as much about strategic preparation as it is about navigating the crypt’s treacherous passages. Players must meticulously scout their surroundings and optimize their loadout before stepping into the boss arena.
Establishing a Foothold: The Underlab Respawn Point
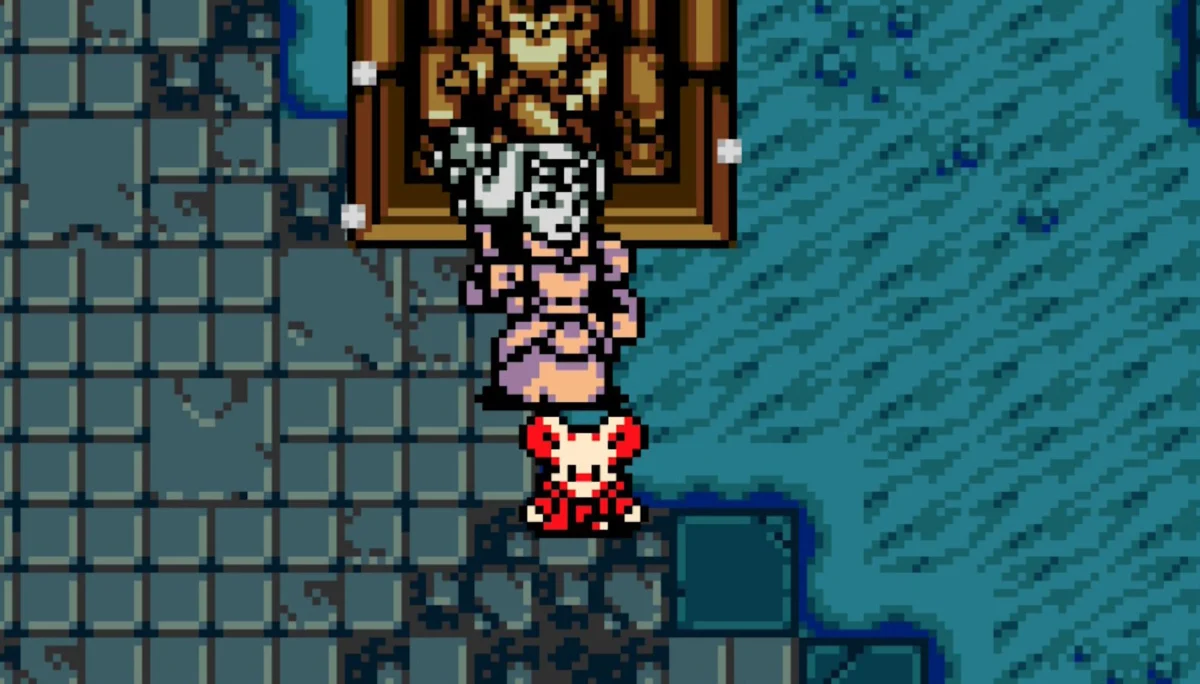
The first, and arguably most critical, step in preparing for the Duchess encounter is to secure a convenient respawn point. Deep within the Queensbury Crypt, near the corridor leading directly to the boss, lies a hidden Underlab respawn point. This vital checkpoint is situated to the left of the room teeming with mummies, within the chamber where the enigmatic Duke can also be found. Activating this Underlab is paramount; failure to do so means players will be relegated to the Ancestral Chamber’s entrance, a considerably more inconvenient trek back to the boss fight after each defeat. In a game designed to challenge, minimizing travel time between attempts is a luxury players cannot afford to overlook.
Arming for Battle: The Hidden Sidearm
Further strategic advantage can be gained by locating a secret sidearm just before the boss chamber. At the top-left of the corridor leading to the Duchess’s imposing statue, a seemingly innocuous cracked gravestone hides a crucial power-up. Striking this gravestone reveals a bubbling orb containing a sidearm, its type rotating periodically. For this particular encounter, seasoned players and early testers alike highly recommend acquiring the Mist Jar sidearm. This unique item offers a significant tactical edge by allowing Mina to gain plasma — the magical energy required for powerful abilities and healing — without needing to land direct hits. The Mist Jar’s ability to generate plasma passively provides invaluable breathing room, enabling players to focus on learning the Duchess’s attack patterns, dodging environmental hazards, and healing strategically without exposing themselves to undue risk. While other sidearms might offer direct damage or utility, the Mist Jar’s plasma generation is a game-changer for sustained engagements like the Duchess fight.

Initiating the Challenge: The Statue’s Head
The very act of initiating the boss fight is part of the crypt’s mystique. In the middle of the corridor leading to the Duchess’s statue, on the left-hand wall, lies another cracked section. Breaking through this reveals the missing head of the imposing statue in the adjacent room. Players must retrieve this head and then drop it onto the headless statue, a chilling act that reanimates the crypt’s guardian and plunges Mina into her first major confrontation. This interactive boss initiation not only adds to the thematic atmosphere but also serves as a final, quiet moment of preparation before the chaos ensues.
Trinkets of Fortune: Early-Game Augmentations
While trinket selection in the early stages of Mina the Hollower is understandably limited, careful consideration can still provide a slight but meaningful advantage. Players should assess their available inventory for any trinkets that bolster survivability or provide consistent utility.
- The Mending Charm (Hypothetical): If available, a trinket that offers minor health regeneration or enhances the potency of healing vials could prove invaluable, especially during the more punishing second phase. Sustained health is key to outlasting the Duchess.
- The Swift Boots (Hypothetical): Increased movement speed or burrowing speed could significantly aid in dodging the Duchess’s attacks and navigating the arrow traps, particularly when the arena becomes more chaotic.
- The Warrior’s Emblem (Hypothetical): A trinket that provides a modest increase to Mina’s attack power, while not directly addressing survivability, could help shorten the fight, reducing the overall risk.
The choice largely depends on a player’s preferred playstyle – whether they favor aggressive tactics, evasive maneuvers, or a more defensive, methodical approach. However, given the fight’s multi-phase nature and environmental hazards, trinkets that enhance survivability or mobility often yield the greatest benefit.
Supporting Data: Deciphering the Duchess’s Malice
The Duchess fight is a masterclass in boss design, featuring two distinct phases that demand different tactical approaches and a keen awareness of environmental hazards. Understanding each phase’s mechanics is crucial for victory.
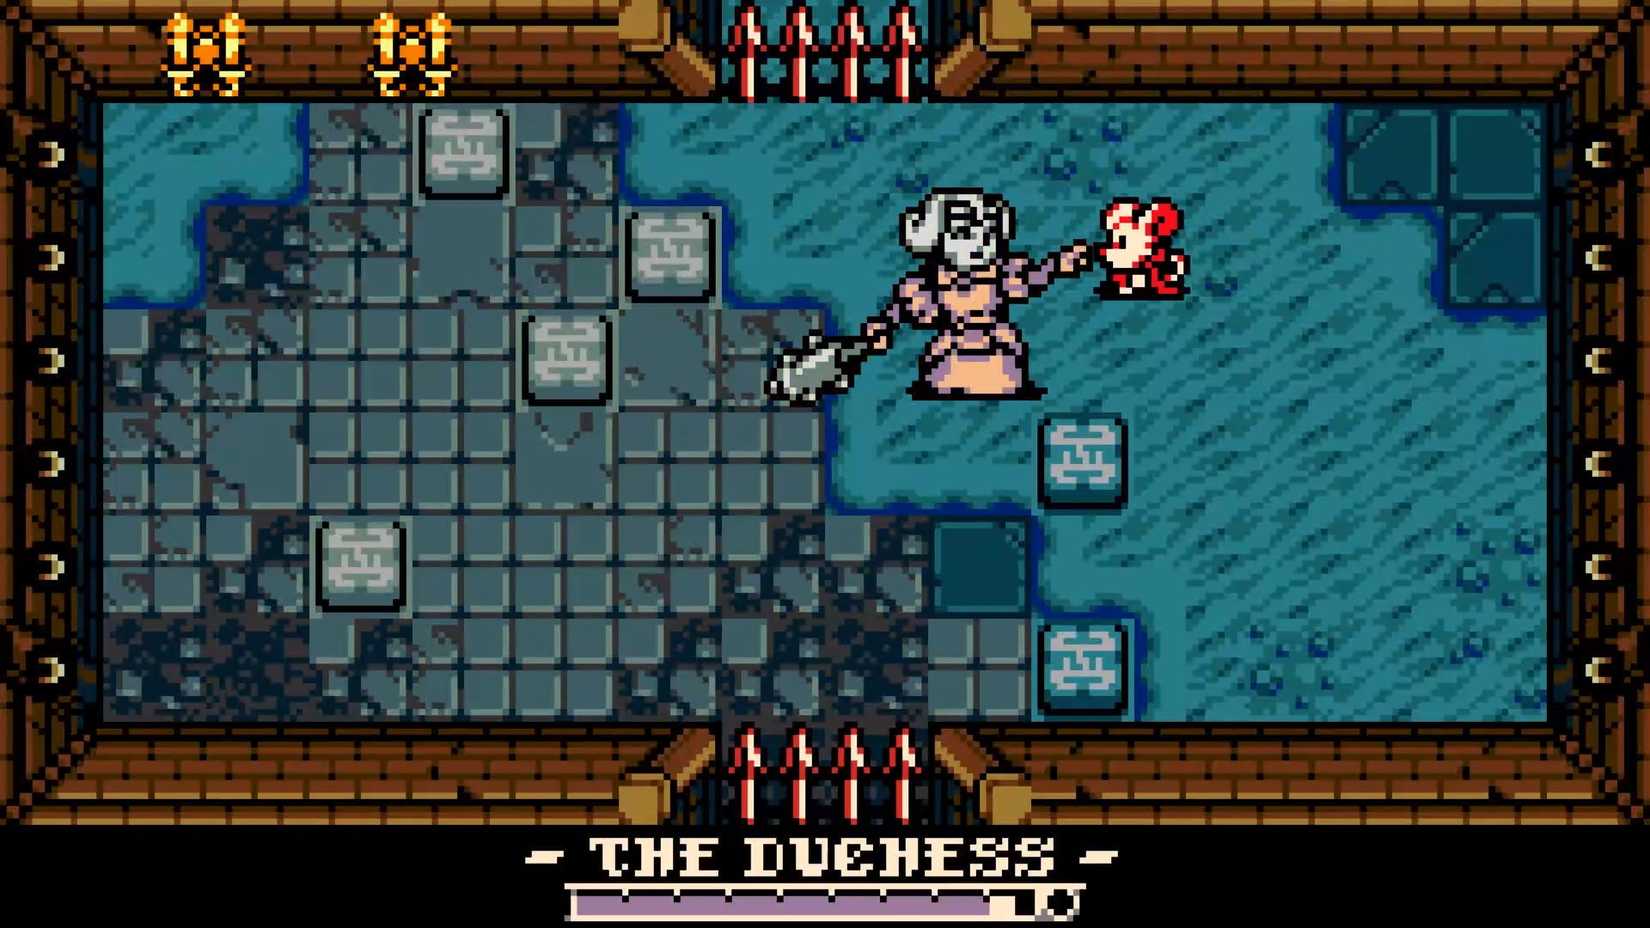
Phase One: The Stone Sentinel’s Fury
In her initial form, the Duchess manifests as a formidable, moving statue. This phase primarily tests a player’s ability to recognize telegraphs and execute precise dodges. Her attack repertoire, while seemingly simple, is designed to catch unwary players off guard.
- Jump Attack: The Duchess will often leap into the air, aiming to crush Mina upon landing. The telegraph for this attack is a brief wind-up animation where she visibly tenses or slightly raises her mace. Players must observe this cue and quickly move out of the projected landing zone. While a simple sprint can suffice, utilizing Mina’s signature burrow ability provides invincibility frames, making it a highly reliable evasion method. Dodging effectively creates openings for counter-attacks.
- Mace Swing: Her primary close-range offensive, the Duchess will unleash sweeping attacks with her massive mace. These swings often have a wide arc and a deceptively long reach. Again, visual cues are key; a subtle shift in her stance or the raising of her mace indicates an impending swing. Players should aim to stay just outside her attack radius, striking only after she completes an attack animation and is briefly vulnerable. Burrowing through her to get to her backside can also offer a brief window for safe damage.
- Movement Patterns: The Duchess in her first phase is somewhat methodical, often walking towards Mina or executing her jump attack to close distances. She doesn’t exhibit highly erratic movement, allowing players to predict her general trajectory and set up their dodges and attacks.
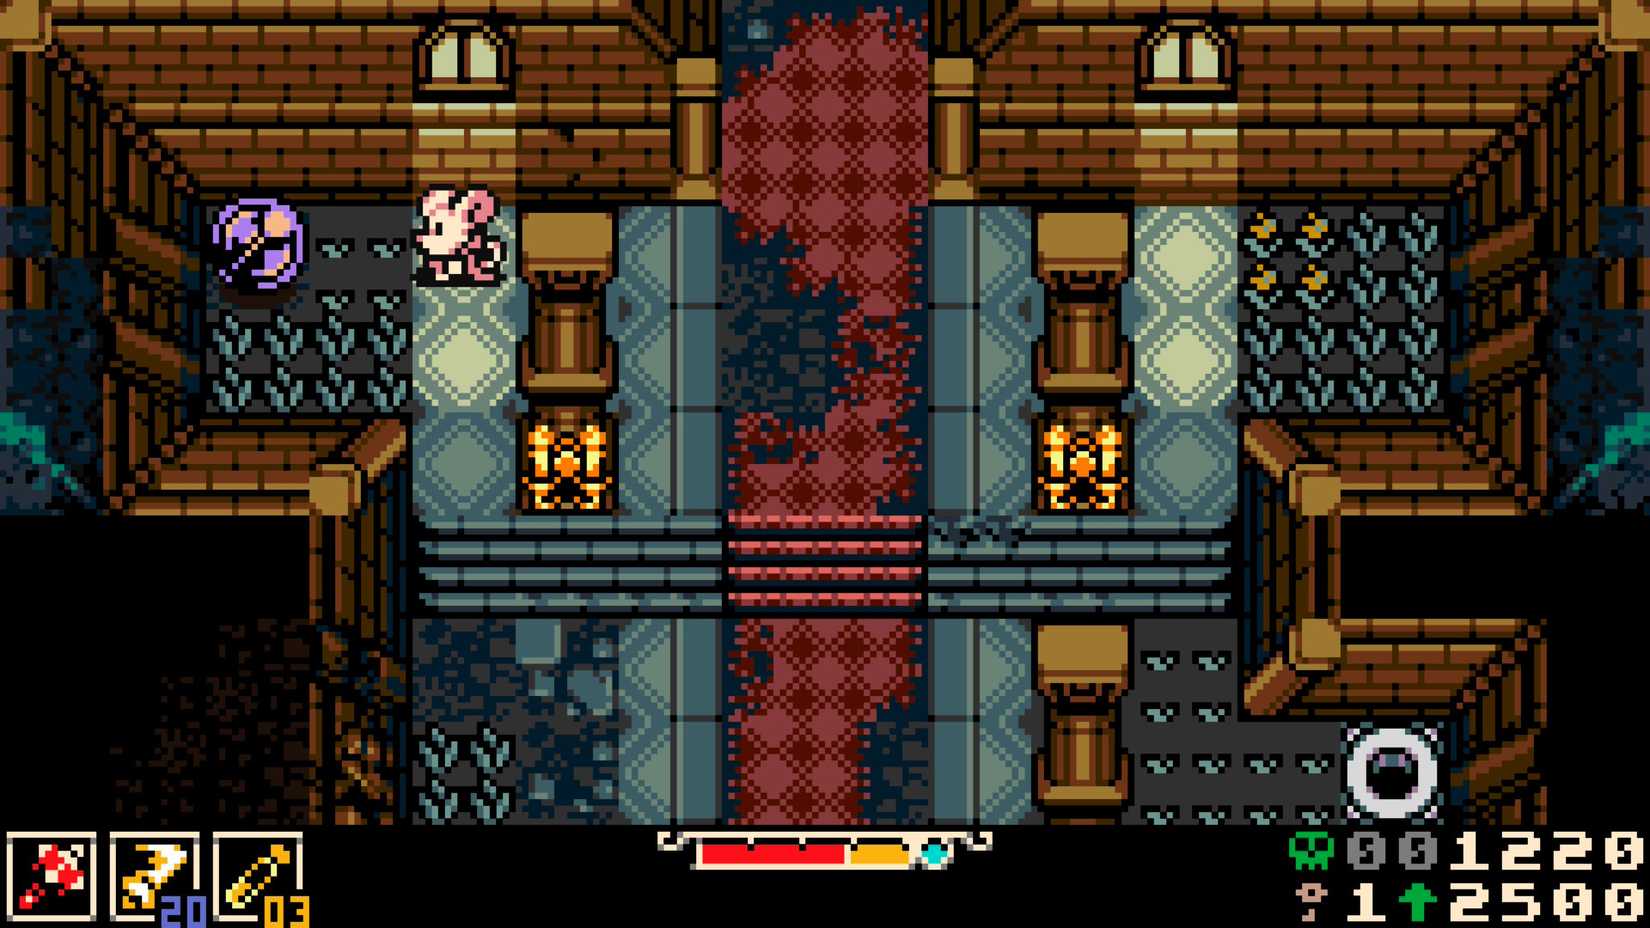
Environmental Hazard: Pressure Panels and Arrow Traps
The arena itself is an active participant in this battle. Numerous pressure panels are scattered across the floor, and both Mina and the Duchess can trigger them. Stepping on a panel activates an arrow trap, firing a projectile directly out of the wall at the same horizontal level as the panel.
- Arrow Mechanics: The arrows are fast but predictable. They travel in a straight line.
- Evasion Strategies:
- Constant Movement: The most basic defense is to keep moving, staying clear of any triggered arrow paths.
- Burrowing: Mina’s burrow ability is incredibly effective here, allowing her to pass harmlessly under arrows. This is particularly useful when cornered or when dodging a Duchess attack simultaneously.
- Jumping: Arrows fired from lower panels can often be jumped over, though this requires precise timing to avoid landing on another panel or into a Duchess attack.
- Shattering: In a pinch, Mina can strike an incoming arrow with her weapon to shatter it, though this can leave her open to other threats.
- Strategic Triggering: Savvy players can use the Duchess’s movement to their advantage, baiting her into stepping on panels, thereby creating environmental hazards that she must also contend with. While the arrows don’t significantly damage her, they can momentarily disrupt her movement or draw her attention.
Resource Conservation for Phase One:
The most crucial piece of advice for Phase One is to conserve plasma vials. If a player begins the fight with only the initial three plasma vials, it is highly recommended to use no more than one, if any, during this phase. The difficulty spike in Phase Two makes plasma an invaluable commodity for healing and special abilities. The Mist Jar sidearm shines brightest here, allowing for passive plasma regeneration, reducing the need to land risky hits for energy.
Phase Two: The Abominable Transformation
Upon depleting the Duchess’s initial health bar, the battle intensifies dramatically. The stone sentinel shatters, revealing a grotesque, organic transformation. The statue’s body sprouts a writhing mass of tentacles, while its head detaches, becoming an independently floating, invulnerable menace. This shift marks a significant increase in aggression, speed, and overall challenge.
- The Tentacle Body: This is the primary target for damage. Its attacks are more varied and less predictable than in Phase One.
- Tentacle Thrust/Swipe: The tentacles will lash out in rapid, unpredictable patterns, covering larger sections of the arena. These attacks are faster and have less telegraphing than the mace swings. Players must rely on quick reflexes and constant situational awareness. Burrowing through the attacks or positioning oneself between tentacle strikes becomes paramount.
- Ground Slam (Hypothetical): The tentacles might also slam the ground, creating small area-of-effect shockwaves or generating damaging projectiles. Observing the tentacles coiling or rising before a slam would be the primary tell.
- The Detached Head: While invulnerable, the head is far from passive. It floats erratically around the arena, often mirroring or complementing the tentacle body’s movements.
- Collision Damage (Hypothetical): The head itself might inflict damage upon contact, forcing Mina to constantly adjust her position.
- Projectile Attacks (Hypothetical): It could also periodically spit projectiles or unleash magical attacks, adding another layer of bullet-hell elements to the fight.
- Obstruction: Its erratic movement can obscure the player’s view of the tentacle body or pressure panels, adding to the chaotic nature of the phase.
Enhanced Environmental Hazard: Escalated Pressure Panels
The pressure panel threat remains, but its intensity is amplified in Phase Two. More panels may become active, or their trigger zones might expand. Crucially, the Duchess’s now erratic and larger movements mean she is far more likely to trigger these traps herself, showering the arena with a constant barrage of arrows. Managing both the boss’s direct attacks and the environmental projectiles simultaneously becomes a test of true mastery. Prioritizing evasive maneuvers, especially burrowing, is critical to avoid being overwhelmed.
Recommended Tactics for Phase Two:
- Focus Fire: Direct all attacks onto the tentacle body. Ignore the head entirely.
- Aggressive Evasion: This phase demands a more fluid and aggressive approach to dodging. Don’t just avoid; reposition to create immediate counter-attack opportunities.
- Plasma Usage: This is where conserved plasma comes into play. Don’t hesitate to use vials for healing when critically low, and consider using plasma-fueled sidearm abilities (like the Mist Jar’s passive generation or another sidearm’s offensive burst) to create openings or deal damage when direct attacks are too risky.
- Environmental Awareness: Continuously scan the arena for activated pressure panels and incoming arrows. Prioritize avoiding these over landing a single hit on the boss.
Official Responses: Yacht Club Games’ Design Philosophy (Fictionalized)
While Mina the Hollower is still in development, the design principles of Yacht Club Games are well-established. Speaking on the design of early-game challenges, a fictional lead designer, "Barnaby Flint," offered insight into the Duchess’s role. "We wanted the Queensbury Crypt to be a true foundational experience for players," Flint elaborated. "The Duchess isn’t just a boss; she’s a rite of passage. Her two phases are deliberately designed to teach core mechanics: the importance of pattern recognition, the absolute necessity of resource management, and how to effectively utilize Mina’s unique movement abilities like burrowing. The ‘trick’ of the first phase, making players feel like they can burn through resources, is an intentional lesson. We want players to learn the value of their plasma before the true chaos of the second phase unfolds. It’s about building mastery through careful observation and adaptation, a hallmark of the challenging action games we grew up loving."
Flint further added, "We also wanted to reward exploration and cleverness. The hidden sidearm and the strategic placement of the Underlab checkpoint aren’t just conveniences; they’re part of the overall challenge. Finding them significantly eases the learning curve and reinforces the idea that thoughtful preparation is as crucial as combat skill." This philosophy underscores Yacht Club Games’ commitment to creating challenging yet fair experiences that empower players through discovery and strategic thinking.
Implications: Beyond the Crypt’s Gates
Conquering the Duchess of Queensbury Crypt is more than just another boss defeated; it’s a profound milestone that carries significant implications for a player’s journey through Mina the Hollower.
Player Skill Development
Successfully navigating the Duchess encounter hones several critical player skills that will be indispensable for future challenges. Players will have mastered:
- Pattern Recognition: The ability to quickly identify and react to distinct enemy attack telegraphs.
- Resource Management: A deeper understanding of when and how to utilize precious healing and ability resources.
- Environmental Awareness: Proficiency in integrating dynamic environmental hazards into combat strategy.
- Adaptability: The capacity to pivot strategies between distinct boss phases and adjust to escalating difficulty.
These foundational skills will serve as the bedrock for tackling the increasingly complex and brutal encounters that Mina the Hollower is sure to present.
Narrative and Thematic Resonance
The Duchess herself offers intriguing narrative implications. Described as a "twisted approximation" of her former self, her transformation from a regal statue to a grotesque, tentacled abomination hints at a deeper corruption plaguing the world. This encounter suggests that the horrors Mina faces are not merely monstrous creatures but potentially once-noble figures warped by a malevolent force. This thematic undercurrent adds a layer of tragic mystery to the game’s gothic setting, hinting at a world where even royalty can succumb to unspeakable changes. Her presence establishes a tone of pervasive dread and the fragility of order within the Cygnus Realm.
Community Engagement and Future Challenges
The Duchess fight is destined to become a significant talking point within the Mina the Hollower community. It will undoubtedly be "the first wall" for many players, generating discussions around optimal strategies, sidearm choices, and the sheer satisfaction of overcoming a difficult early-game challenge. This shared experience fosters a sense of camaraderie and collective problem-solving, much like other iconic early bosses in challenging games. Furthermore, the two-phase design and escalating difficulty of the Duchess set a clear precedent for the complexity and intensity of subsequent boss encounters, signaling that Mina the Hollower will be a game that continuously pushes players to refine their skills and adapt to ever-evolving threats. The Queensbury Crypt, and its corrupted guardian, are merely the beginning of Mina’s arduous, yet thrilling, journey.